Saturday 28 April 2012

Classic Outfit...and an annoucement!

Hello dear readers~

Today I'll show you an outfit, and tell you something exciting!


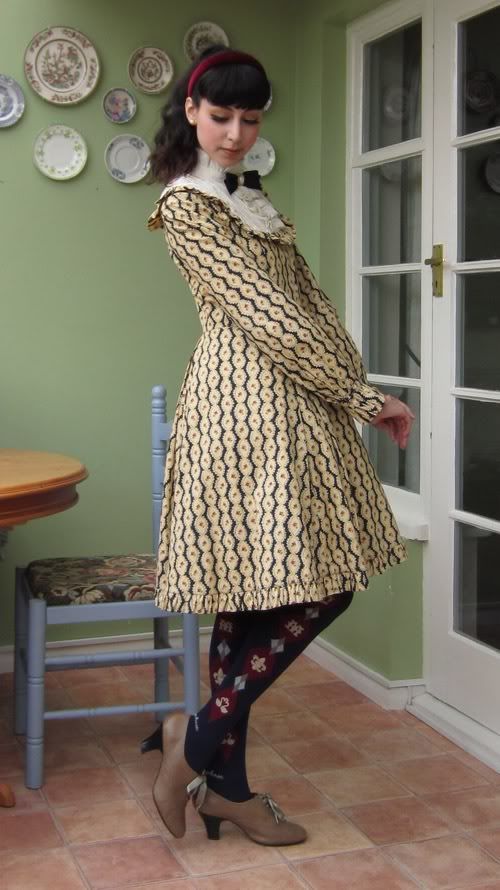
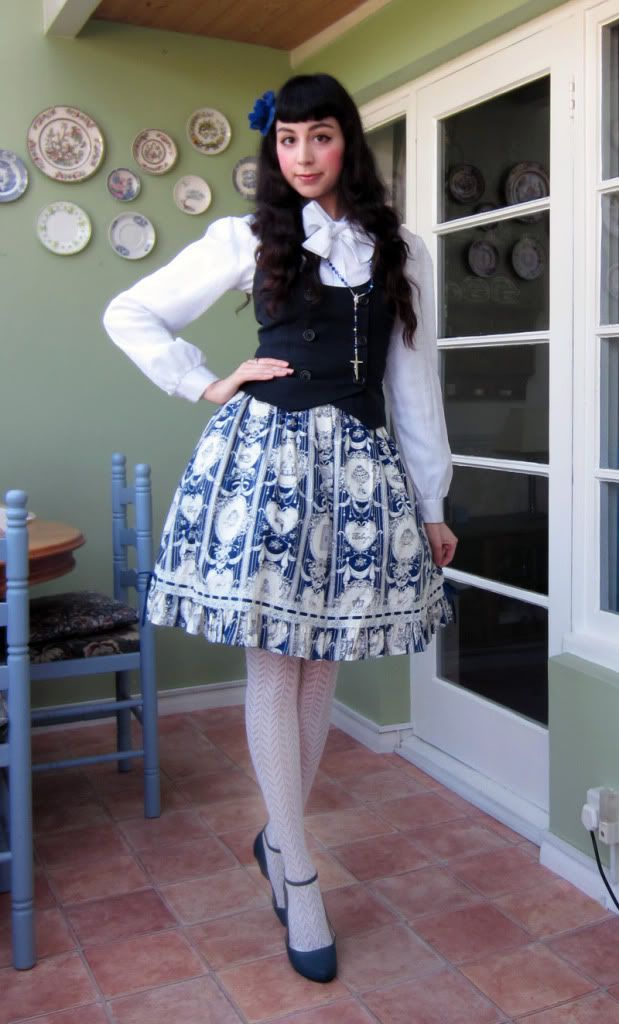
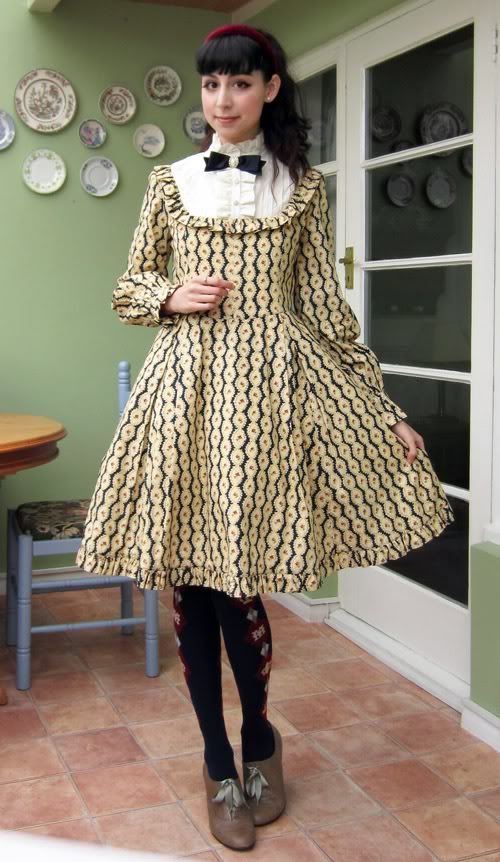
This time I wanted to make a really classical outfit. A high-collar onepiece is typical classic lolita. Oxford shoes and argyle print socks keep to the traditional, prim effect. The print of the dress includes little red flowers, and I picked these up by adding bordeaux to the rest of the coodinate. 

~Rundown~
Onepiece: Handmade
Ribbon Brooch: Vintage
Socks: Metamorphose
Everything else: Offbrand

Now for my announcement.....

This summer, I am moving to Tokyo!

This is something I've wanted to do for a very long time, and finally the timing is right. I'm feeling rather sad to be parting from my friends and family here in England, but I'm looking forward to joining my friends there and meeting up with new people. I will stay about one year, and see how I do.

 I will be studying Japanese for the first few months, and I'll look for a job so I can save up and do some travelling. I want to visit Hokkaido, Okinawa, Hiroshima, Osaka, Kyoto.... lots of places! I love Japan, and I'd like to see as much of it as I can. 

I can't wait to start my Japanese course! I started to study Japanese by myself when I was 16 or so, and I had evening classes at SOAS for a couple of terms while I was at university. I've been taking evening classes once a week since September at a college here in Sussex, but it is very difficult to make much progress studying that way. In Japan I'll have lessons Monday to Friday, so with hard work and effort on my part I hope I'll improve my level quickly. 

I'm also looking forward to going to lolita events and seeing my favourite bands. And those two most important activities- shopping and eating. It's going to be tough on my wallet, being surrounded by wonderful shops and beautiful clothes! 

 Of course, I'll keep blogging while I'm there. Thank you all for your lovely comments over this past year or so. I'm really enjoying getting to know you through this blog, and I hope you'll continue to follow me in the future. This is a very exciting step for me, and I hope this blog will become more exciting too!

See you next time,

Sapphira
xxxx

Saturday 21 April 2012

Classic Lolita Make-up Tutorial

Natural Cat Eye Make-up Tutorial

Hello dear readers! How are you today? Hope you are well.

Today I'm trying something for the first time; a make up tutorial. The lovely Namalie asked me to make one, and I was happy to oblige.


This tutorial is for my everyday eye make-up style. As a classic lolita, I try to acheive a look that is natural but still doll-like, emphasising big eyes. I use black winged eyeliner, neutral eyeshadow and occasionally half lashes.  Mine are from Daiso- cheap but effective!

These half lashes give an nice emphasis to the outer corner of the eyes, which is perfect for cat-eye make-up.

Here is what you'll need to create this look: 
Black liquid eyeliner pen
White eyeliner pencil 
Light gold eyeshadow
Dark gold eyeshadow
Eyelash curler
Black volumising mascara
Half-type false lashes
Lash glue

Now on to the tutorial!

1. Start by applying your favourite base make-up. I use a mineral powder foundation, and make sure I put some on my eye area and eyelashes in order to create a good base for my eye make-up to stick to.

2. Use the liquid eyeliner pen to line the roots of your upper lashes. It's a little difficult to describe, but you should run the pen under your lashes, not quite on the waterline but right at the roots. It doesn't show much in the pictures, but trust me, it makes a difference!

3. Draw a line starting slightly in from the inside corner of your eye, extending outwards and downwards from the outside corner of your eye. Drawing the line downwards gives a tare me (drooping eye) effect for kind-looking eyes.

3. Draw a line from the centre of your lower lid outwards and upwards, connecting with the line we drew before. This creates the template for the retro neko me (cat eye) wing.

4. Now fill in the wing, ensuring that the line narrows as it nears the inner corner of your eye. Use the white eyeliner pencil to add a highlight to the inner corner of your eye. 

5. Here you can see it from a different angle. The white eyeliner helps to open and brighten the eye.

6. Apply the light gold eyeshadow all over your upper eyelid and eye socket, and along your lower lash line. Add a little extra on your browbone to highlight.

7. Applying rather thick eyeliner has caused the double eyelid to appear decreased, so now we need to restore some depth to the eye area. Apply the dark gold eyeshadow to your eye crease.

8. Also apply some to the outer corner of your lower lid, and blend the two shades together. If any of the shadow has got onto your eyeliner (it probably has), reapply.

9. Allow a little time for your reapplied eyeliner to dry, then curl your upper lashes and apply black mascara.

10. Again, allow some time for your upper lashes to dry. Then apply black mascara to your lower lashes.

11. The finishing touch is the application of the half lashes. Half lashes are great for beginners as they are much easier to apply than full lashes, being much shorter. Apply a fairly generous amount of glue to the spine of the lash, making sure to put a little extra at the ends. Allow 30 seconds for the glue to become tacky, then apply the lashes slightly outwards and downwards of the outer corner of your eye (following the line we drew in step 3).

Finished!
Well, I'm not be a make-up genius and I'm still trying to make improvements here and there, but I tried to make my tutorial as clear and concise as possible so that anyone can use it, even lolitas who have not tried make-up before. Let me know what you think!

Have a lovely weekend everyone,

Sapphira
xxxx

Saturday 14 April 2012

Casual Spring Coordinate

Hello readers! How are you? I hope that everyone is well and happy!

Today I'm going to show you the outfit I used to enter the Yuka Obara x Kawaii.i coordinate contest. I mentioned it before but I didn't post the outfit.


Yuka Obara, known as Yunkoro, is a super-popular gal blogger. Well, obviously I'm a lolita, but I do admire some aspects of gal style. Yunkoro is stylish and clever, with great make-up skills and morishame technique (taking self-shots with a phone camera). You can find her blog link at the end of this post!

The theme for the contest was "Spring Coordinate" I wanted to incorporate some pastel colours since that's the spring trend this year. I like it a lot, and I'm thinking of which new pastel items I want to add to my wardrobe.

I also used chiffon fabrics to give a light, airy look to my outfit. Both the headbow and blouse are chiffon. Ankle socks are popular again this season, and I really like them! At the moment I only have cream and white ones; I think transparent ones would be very cute.

~Rundown~
Chiffon scarf (used as headbow)- Vintage
Skirt- Fairy wish
Everything else- Offbrand 

Please check the Kawaii.i page for news on Japanese fashion:

And please take a look at Yunkoro's blog

Thank you for looking!

Sapphira
xxxx

Monday 9 April 2012

Straw half-bonnet tutorial

Hello readers! How are you? 

As you can see, I've changed Elegant Poupée's appearance a little. It still needs some work though.

Today I've put together a tutorial for you. I'll explain how I made the straw half-bonnet I wore for my recent photoshoot (it's very simple!) as well as sharing some general bonnet tips.


~STRAW HALF-BONNET TUTORIAL~

This bonnet was constructed from an existing straw hat. There are just five simple steps to make it.

I started with an ordinary straw hat. This one is quite small, meant for children to decorate for Easter. It's constructed in a continuous strip of woven straw, which makes it very easy to work with. This tutorial may not work as well for other types of straw hats!

1. The first thing to do is cut a slit into the brim and up to the crown. Then cut away the top part of the crown (half-bonnets have no back to them). Cut along the edge of the woven strip for a neat finish. It sort of looks like a half bonnet already, doesn't it?

2. Now we have to determine how much of the brim to cut away. I did this by cutting away at the brim bit by bit and trying it on until I was happy with it. This is what I ended up with. You can refer to the photo at the beginning of the post to see what size we are aiming for.

3. Of course, we are now left with rough edges where we have cut into the straw. We'll cover those up by stitching ribbon or bias binding around. As you can see, I incorporated the bonnet ties into the binding. At this point, the bonnet is basically finished! That was easy, wasn't it?

4. We are missing one important thing though, and that is a little decoration to make our bonnet pretty. Since it's a straw bonnet with a country loli feeling, flowers, fruit, cotton lace or gingham ribbon might be nice. I coloured in these white foam craft roses with marker pens to match my chosen colour scheme, and tea-stained the doilies I bought from Daiso in Singapore to make my bonnet adornments.


5. Since the shape of the bonnet has somewhat unsightly corners, it's better to arrange the decoration to cover them. Although, the corners are much less noticeable when worn. Sew or glue your decorations on firmly. Well done, your straw half-bonnet is finished!


My tutorial was the cheat's way to do it, but if you'd like to try something a bit more professional, how about taking a look at this lovely tutorial from Tyler of Lily of the Valley?

Bonnets take a bit of confidence to wear, so for now I'm starting small and simple. I would love to wear a more grand bonnet for a photoshoot or Lolita tea party! Maybe when I've gained more confidence I'll wear one for going to buy milk or post a letter.... There are a few brands whose bonnets make me dream of that day!

Triple Fortune http://3-f.jp/
The milliners that make a classic lolita's heart beat faster! I tried on a most beautiful pale blue bonnet in Atelier Pierrot two summer ago, I regret so much that I didn't get it. 

A brand run by Caro of Fyeah Lolita. Check the bonnet gallery for pictures of her wonderful creations! 

The website hasn't been updated forever, so I suspect this brand is on hiatus. However we can still enjoy beautiful pictures of these lovely and intricate bonnets. Sumika-san, the designer, is so stylish! Perhaps you've seen her snap in KERA or Gothic and Lolita Bible?

Thank you very much for reading today's entry. I hope you found it useful and perhaps even interesting! Which bonnet brands do you admire? Do you know what happened to Kaleido Waltz? Have you made any bonnets?

See you next time,
Sapphira
xxxx

Thursday 5 April 2012

Classical Lolita Coordinate ~what does a blue rose mean?

Hello readers!

How are you? It's the Easter long weekend at last. I've been so busy at work I've really been looking forward to this little holiday! This weekend I will spend time on my Japanese studies, and also on making some tutorials to post here.

Today I'd like to show you the outfit I wore to visit Chichester with my father. The colour scheme was blue and white, with my Marie Antoinette skirt as the focal point. With the dandy style of the blouse and the smart double breasted waistcoat I intended to give my classic lolita outfit a bit of an aristocratic flair.

~Rundown~
Blouse: Vintage
Skirt: Baby, the Stars Shine Bright
Corsage: Handmade
Everything else: Offbrand

My father loves books, so we spent a lot of time in bookshops that day. I got a little book on the language of flowers, which I've been meaning to learn more about for the longest time. I discovered that roses especially have very pretty meanings, for example the Austrian rose means "Thou art all that is lovely", and the China rose means "Beauty always new".


But what about a blue rose, like mine? Blue roses aren't natural unfortunately, but owe their hue to being placed in coloured water. I was rather sad to discover this! Still, they are my favourite.

I hope you liked my outfit! See you next time,

Sapphira
xxxx
Related Posts Plugin for WordPress, Blogger...